

Price: $22.68 - $8.99
(as of Aug 25, 2021 15:51:59 UTC – Details)
Product Description


About Windshield Repair:
• This Windshield Repair kit is designed to provide vehicle owners the necessary information and tools to repair small damages in laminated automotive glass windshields.
• This Repair kit should only be used on bulls-eye, spider web, star damages, and some combination breaks smaller than 1 inch (25 mm) in diameter. This kit will not repair surface pits larger than or
cracks longer than 3/16 inch (5 mm).
• If the damage(s) are in the Driver’s Primary Viewing Area (DPVA), as described in the ROLAGS, owners should have their windshield inspected by a professional glass repair technician to determine whether the windshield should be repaired or replaced.
• This kit can be used to repair multiple damages.
• The use of this kit may not repair the full optical clarity of the glass.
DIRECTIONS FOR USE
Preparing the Surface:
• As soon as damage occurs, cover area with Transparent Tape to keep moisture and dirt from entering the damaged area.
• The damage should be repaired as soon as possible to prevent small cracks from spreading.
• Do not make repairs in direct sunlight.
• Ideal application temperature is 60°F to 90°F (15°C to 32°C). Allow the vehicle sufficient time to acclimate to this temperature if it has been in either a hot or cold environment.
• Surfaces must be clean and dry to make a proper repair.
• Do not allow the resin to come into contact with the car’s painted finish, wiper blades, or plastic trim as this may cause damage. Not all damages can be repaired to restore full optical clarity.
IMPORTANT! To reduce the risk of chemical contact to skin and eyes, always wear safety glasses and gloves when handling this product.


Product Features
● Easy to use – takes only minutes
● Repairs all types of laminated windshields
● Minimizes the appearance of chips and cracks and stops them from spreading
● Advanced resin formula
● Good for multiple repairs


Product Features
Avoid the hole or crack expanding, ensure your secure safety.
No need to take out windshield, Avoid any damage from replacing windshield.
Saving money for changing windshield.
Easy to use with few minus


Don’t Use in Below Situations
DON’T fix your windshield under the sun or in the night and at rainy day.DON’T fix your windshield in the night and at rainy day.DON’T fix your windshield after washing the car.Please fix it without UV at first, and then solidify it with UV


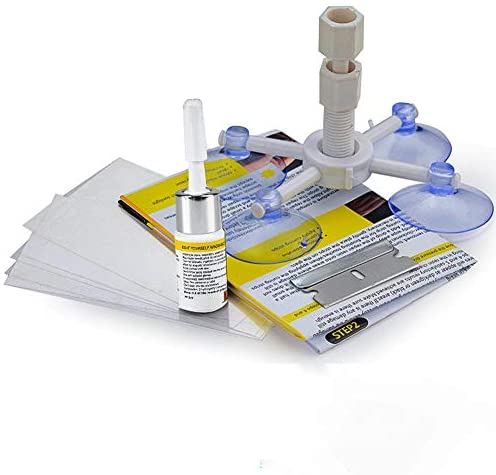
Package included
1 Instruction
1 bottle repair resin
1PCS sleeved razor blade
1PCS repair device
5PCS curing strips


STEP1
Remove loose glass fragments by scraping over it with
the razor blade. Affix the applicator base to the windshield.
Make sure the ring is centered above the break.
Do not cover any cracks with the suction cups.
Note:•suction cup legs are adjustable.
• Clean area with dry towel
• Center ring over impact point


STEP2
Screw the resin chamber into the center ring.(B)
Screw down the resin chamber (turning clockwise)fla-
tting the rubber mouth to the windshield completely
but genlty.
Excessive pressure will affecting the flow of the repair
resin and effectiveness of the repair.
• Screw resin chamber into center ring until it touches
the impact point.


STEP3
Squeeze 3-6 drops of the repair resin (depending on
the extent of the damage in to the resin chamber,If
the resin leaks out of the bottom of the resin
chamber,gently turn the resin chamber clockwise,just
enough to prevent leakage.


STEP4
Screw the pressure driver (clockwise) into the resin chamber to drive the resin into the break. Tighten until the pressure driver is almost screwed all the way in.
Check from inside the car to make sure the rubber mouth has opened wide. Allow the repair resin time to be absorbed into the break (4-6 minutes depending on the extent of damage). I f the repair resin has not reached all areas of break, you may apply heat on the inside of the windshield with a hot air gun or hair drier (not included). Use caution, excessive heat may cause further damage. Slightly re-tighten the pressure driver (about 1/4 turn) to push the repair resin further into break.


STEP5
Unscrew and remove the pressure driver from the resin chamber to release any air
trapped in the chamber. Re-insert the pressure driver and screw down again to
displace any air remaining in the break. To determine if the repair resin has been
absorbed into the break, look at the glass from an angle of about 45. Make sure no
air bubbles remain in the break. In the case of chips or bull’s eyes, examine the
glass from directly behind the damaged area. Unrepaired areas will appear as
dark (green or black) areas. If there is any damage still visible, repeat steps 4 and 5
satisfactory results are achieved. Make sure there is enough repair resin
remaining in the resin chamber.
Works for the following cracks- Different cracks may need different methods


❤ Easy to use windshield crack repair set, windshield repair kit can quickly and effectively repair small cracks,bullseye,star horseshoe and so on only in 20 minutes.
❤ Advanced resin formula, good for multiple repairs, fit with all types of laminated windshields.The air in the crack will block the infiltration of the repair fluid, and our windshield repair kit have vacuum function to quickly remove air from the crack.
❤ Imported repair fluid (this is the key), the shear strength can reach to 20PA, the repair location will not be broken even though glass break. And can prevent small cracks from spreading.
❤ Enhanced injection plastic injection molding head, can produce a strong pressure to push the repair liquid into cracks.


